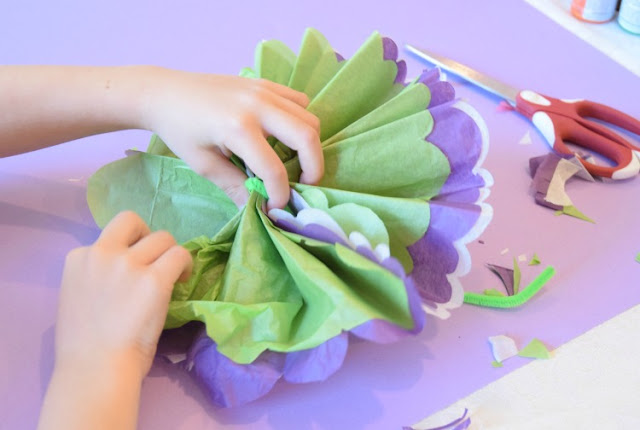
I think that you and your kids are going to LOVE making these tissue paper flowers. When I was little, my sister and I made them all the time. I had completely forgotten about tissue paper flowers until one day recently when I dropped my daughters off to spend the day at their grandparents house. My mom met me at the door with a bright and colorful flower that she had made, thinking that my daughters might enjoy making some that day. I remembered how fun and easy they are to make, and how bright and pretty they are when they're finished. Lena and Maggie are hooked- we've been in flower production mode ever since.
Here's how to make your own Tissue Paper Flowers.
This
post may contain Amazon or other affiliate links. If you use these
links, I may earn a commission at no additional cost to you. Click here for my full privacy and disclosure policies.
Gather Materials For Tissue Paper Flowers
- tissue paper (surprise!)
- scissors
- pipe cleaners or floral wire
Choose Your Colors And Cut Your Paper
We like to make flowers with three different colors, but you can obviously do what you like. Lay out 3 pieces of tissue paper in a stack. Standard size tissue paper is 26" x 20". Cut down the center, so that your pieces are 26" x 10". This will make flowers that are approximately 10" in diameter. You can make them with full sheets of tissue paper, as well, but you may want to add additional sheets of paper to get a nice fullness. You can also cut the paper into thirds (26"x 6.5"ish) or quarters (26" x 5"), but my daughters had the most success with the 10" size.
[Related Read: Little Bird Suncatchers]
Fold And Fluff
Holding the 10" side in your hands, fold the tissue paper with an accordion or fan fold (back and forth) with each fold measuring about 1" wide. Make sure to crease the edges well.
Wrap a pipe cleaner or length of floral wire around the bundle. Whatever color is facing up will be in the center of your flower. The flower in the picture above, for example, will have a green center.
[Related Read: Fat Quarter Fabric Bunting]
Begin to open up the flower by spreading the ends of the tissue paper towards one another, making a fan shape on each side.
Starting with the color on top (in this case, green), begin separating the pieces of tissue paper. Pull gently, so that the paper doesn't tear. You're essentially pulling each layer of paper up towards the center of the flower. Lena did better when I used the language, "Separate the layers," than when I said, "Pull it up." Once you've got the center layer fluffed up, repeat with the middle layer. Finally, fluff up the bottom layer.
[Related Read: Books About Spring And Changing Seasons]
You can vary the look of your flowers by trimming the ends of your accordion folded bundle. You can round the ends, to make a nice smooth look, or you can fringe it to make a crazy flower like the one above.
Make yourself a whole beautiful bouquet! Your kids will enjoy experimenting with different colors, sizes, and textures!
And, if they went crazy with tissue paper flowers like my daughters did, turn them into a bright and cheerful Tissue Paper Flower Wreath!
And, if they went crazy with tissue paper flowers like my daughters did, turn them into a bright and cheerful Tissue Paper Flower Wreath!
You May Also Be Interested In
From Other Great Bloggers
Textured Tissue Paper Flowers from Buggy and BuddyTissue Paper and Paper Plate Rainbow from Happy Hooligans
Tissue Paper Art from Fantastic Fun and Learning
Tissue Paper Dragonfly Craft from Crafty Morning


